HORSE WOUND CARE

By Dr Louise Cosgrove
Introduction
How many of you go to the produce store when your horse has hurt themselves and think: “Oh my God! There are so many products available.” Knowing which healing product to choose and when to use it is often overwhelmin and simply mind boggling.
My aim is to make it simple in this article and highlight the many common mistakes horse owners make when deciding what to put on wounds.
Two Golden Rules
The first thing to refresh are the four golden rules when it comes to wounds. They are location, location, location and size… Okay, there are really only two golden rules:
- Location
- Size

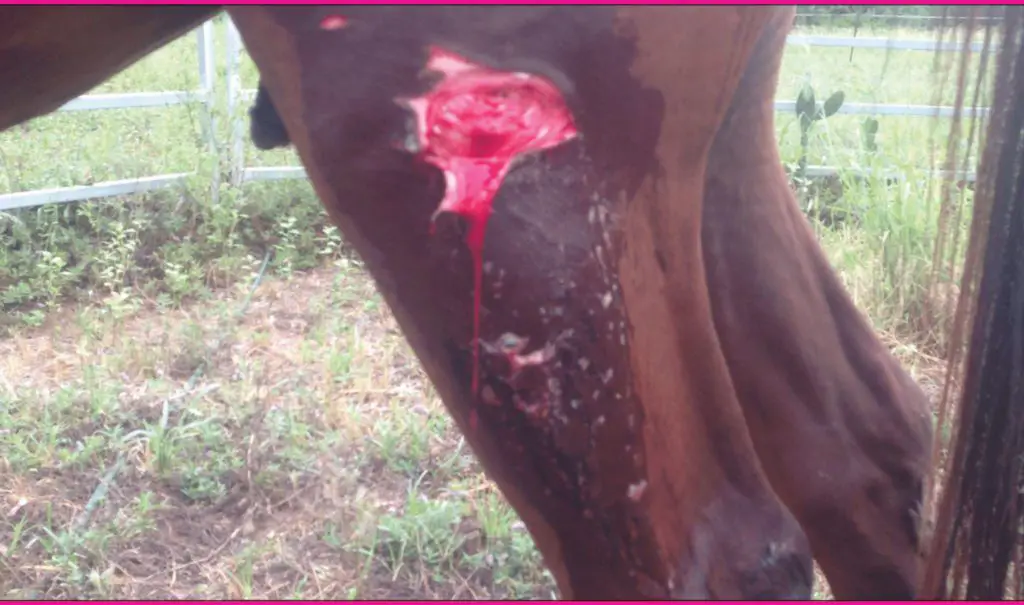
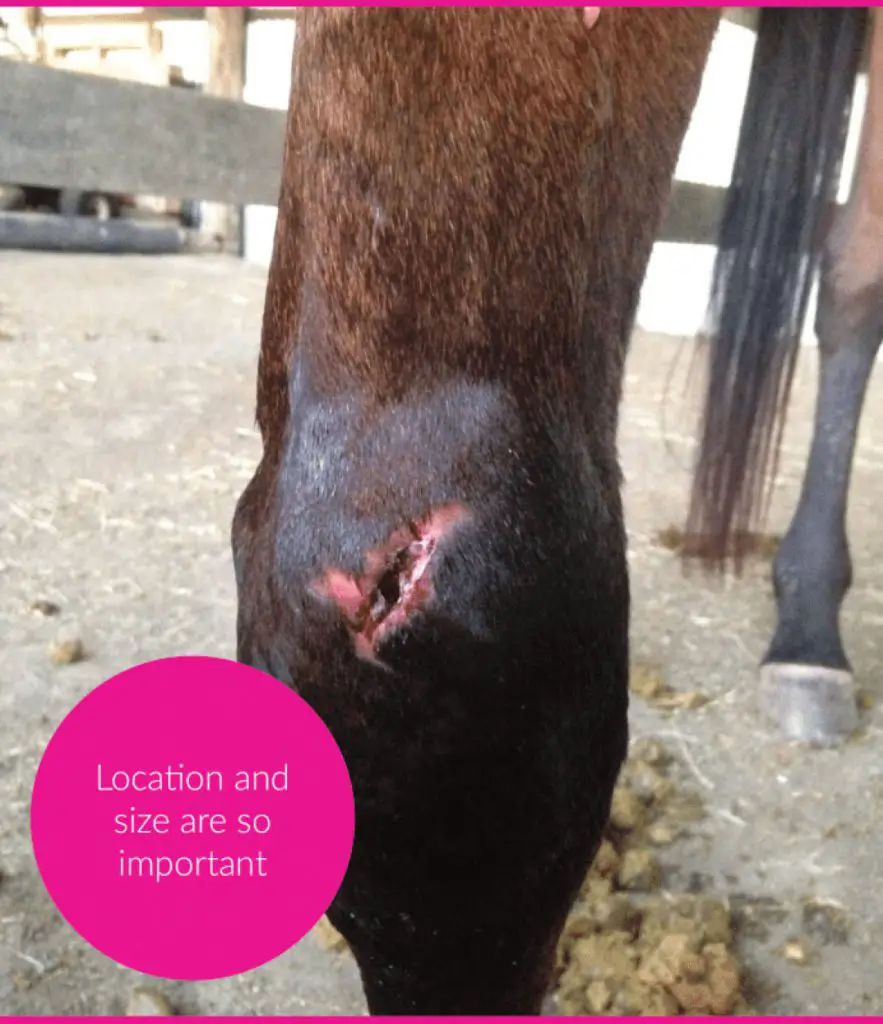
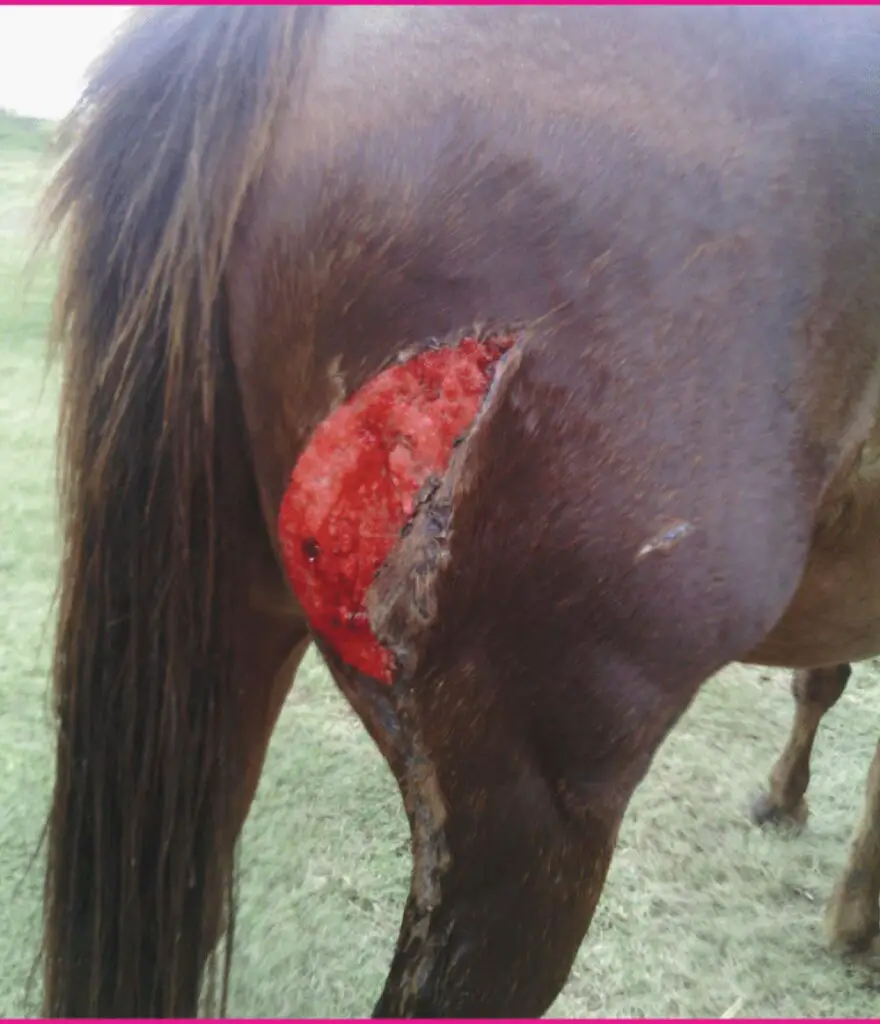
Location is the most important of all. Location relates to where on the horse the wound is – not where on your property the horse injured itself! A general rule of thumb is anything from the knees and hocks down need to be assessed carefully as there is little room for error in these locations.
There are many important structures close to the skin, and any small laceration can penetrate tendons or other important structures. A solid knowledge
of anatomy is often required to decide if anything further than bandaging is required. This may mean a Vet visit to rule out anything sinister or check that no important structures have been damaged.
Size refers to the fact that, sometimes, small wounds can be more serious than large, gaping wounds. A puncture wound that is 10cm deep, but only 2mm wide is often far more serious than a wound that is 2mm deep but 10 cm wide.
This paper is not going to cover any more on the golden rules, but more so on what to put on a wound immediately and further on down the healing track.
Something to understand with wounds is the body has a specific set of processes that happen throughout the healing of a wound. There are four stages in total and each stage is dependant on the
stage before it. This means if one step fails, the rest won’t follow. However, some stages or phases can overlap. They are:
Indammatory Phase
The first stage is the inflammatory stage. This occurs immediately when a wound is sustained. The skin begins retracting, due to tension, and the inflammatory mediators become activated. The body enables local vasoconstriction of vessels,
so the horse doesn’t bleed to death. The immune system sends in white blood cells to prevent the spread of bacteria and tries to localise the damage to prevent further healthy tissue being damaged. This enhre process occurs in the first hour of the injury. Fibrin is also mobilised to allow a clot to form and the second phase to begin. Unfortunately though the downside to this phase is redness, swelling, heat and pain, which can cause more tissue damage if not controlled, and slows the second phase of healing.
Debridement Phase
The second phase is the debridement phase. This stage is critical for all wounds and healing cannot proceed without the completion of this stage. This is the ’pus’ phase! Pus is a normal part of the healing process and does not necessarily mean infection.Pus is the by-product of neutrophils, which are specialised white cells that are capable of engulfing and destroying bacteria. The neutrophils enter the wound and kill the bacteria, break down debrisand boost the inflammatory response. Like the first stage though, this can slow down the healing process if too many neutrophils are recruited.However, neutrophils are not very selective and also break down fibrin, which the body is recruiting to fill the deficit of the wound. When this occurs, it slows the healing process.
Excess neutrophils can be avoided by keeping the wound clean and giving appropriate antibiotics to also help kill the bacteria. These can be given both locally and or systemically. Epithelialisation also occurs during this phase, and begins between 8 and 10 hours after the wound occurs. This is the process which shrinks the wound. Epithelial cells (skin cells) migrate under the scab to form new skin. This process occurs very slowly at a rate of 0.09-0.2mm per day. Certain factors can slow or even halt this process. These factors include infection, repeated bandage changes, extreme cold, wound drying out and excessive granulation tissue (commonly called ’proud flesh’).

Repair Phase
This phase starts about 4 to 5 days post-wound. Fibroblasts move into the area and begin to knit the wound edges together to fill the defect. Granulation tissue (or proud flesh) carries the fibroblasts and collagen into the areas. and serves as a glue to allow the epithelial cells (or skin cells) to attach and knit down, causing contraction of the deficit. Granulation tissue is resistant to infection and wound contraction centers around its presence to allow the epithelial cells to migrate.
Although extremely important, excess granulation tissue can be more of a headache and prevent healing from occurring. Horses can be ‘overachievers’ and produce too much – especially where there is excessive movement, such as over joints. The easy way to identify if there is excess granulation tissue is if it has risen higher then the surrounding tissue edges of a wound. This prevents the epithelial cells from migrating and multiplying to reduce the wound size. Wound contraction occurs best in areas with little tension on them – where the skin is loose and doesn’t get pulled when walking, like on the torso, rather than the lower limbs.
Maturat1on Phase
This phase can last for months to a year, and is the scar formation and strengthening phase. The number of fibroblasts decreases and collagen production increases to give the wound its strength. The scar will always be weaker than the surrounding area by about 20%, but the size of the wound can differ greatly depending on the care given to the wound throughout the first three stages.
As you can see by these stages, it is imperative to provide the best environment to facilitate optimal healing. Even though we can’t speed up the healing process, we can make sure it is tracking at the fastest pace possible. There are many things that can be used without veterinary attention as most horse owners will have certain things on hand.

The two most important things that only Vets can prescribe is antibiotics and bute. Bute is a non- steroidal anti-inflammatory, however, most Vets will administer bute and you may have some left over from a previous horse or injury. The bute will always have a use by date on the container and, as long as it has been stored correctly (out of direct sunlight and at room temperature), it will be safe to use.
Always ring your Vet for a dose rate as bute requires a larger loading dose then a smaller once daily or twice daily dose, depending on the injury. As an example, a 500kg horse requires a 10mI loading dose, then a 5mI dose once or twice daily for 5-7 days, or sometimes longer if the wound is very contaminated and large, or over a joint, etc.
Antibiotics are also only to be administered by a Vet and if you have any left over from previous injuries always check the use by date and dosage for the horse you are thinking of treating. Bear in mind dosage rates change with size of horses and also location of wounds. Always ring your Vet for advice on antibiotics.
An example of this is penicillin – it is a great antibiotic for superficial wounds or wounds that have oxygen penetration. If the wound is deep and air can’t get to it, then penicillin is not enough and other antibiotics need to be used. Antibiotics need to be given at dose rates high enough to get into tissues where they are needed to kill bacteria,
Vets are trained to use antibiotics to their potential without causing the numerous side effects that can happen. The most common mistake owners do when self medicating is using the wrong antibiotic, not using it for long enough, or not using enough.
Giving one dose of penicillin is not going to do a great deal. Antibiotics are required if the wound is deeper than skin deep and affecting underlying tissue, such as tendons or into muscle bellies. If the wounds are over joints, always get your Vet to assess the wounds, and prescribe the correct treatment and antibiotics. Don’t mess around with injuries over or around joints, as the sooner antibiotics are started, the less damage will be caused to these important areas – and the greater the chance of having a sound horse at the end.

First Aid Response
The first step once you have discovered a wound on your horse is to clean the wound thoroughly so the immune system doesn’t have to be overworked. The best products to use are betadine or chlorhexidine products. These are powerful disinfectants and will kill bacteria that are present in the wounds. If all you have is Dettol, this is better than nothing, but dilute it well – at least 1 part Dettol to 10 parts water. The key to disinfectants is contact time – the more time they are in contact with the infected area, the better they work, but if you leave them on too long, they prevent the healing process from progressing. A contact time of 10-20 minutes is ideal. If the wound is full of mud and grass or dirt, feel free to use the garden hose to get in and thoroughly remove the larger particles and then apply your disinfectant.
Don’t use too much hose pressure in case you blast dirt and debris deeper into the wound site.
unable to wrap
above the hock and
not too deep so treat
yourself if up to date
with tetanus.
Once the wound is cleaned and disinfected, have a good look at the location and size, and decide if a Vet is required. General knowledge of anatomy is helpful here. However, another rule of thumb is anything below the hock or knee that is more than skin deep requires your Vet’s attention.
If a Vet is not required or can’t be contacted now, it is time to decide what next. If the wound is in an area that can be wrapped — wrap it. “What with?”
I hear you say… Well this is where the list gets big! Now, by no means, will I cover every product
available to you, but I will cover what I like and what works for me!
If the wound is at all contaminated, I like to use Animalintex on the wound for 24 hours – and re-apply for a following 24 hours if extremely
contaminated. This is a poultice, and has a shiny plastic side and a powdery material size. The powdery side goes onto the wound, and has products in it that draw out debris and bacteria. Other products you could use would be sanitary pads or baby nappies.
If the wound is fresh and not contaminated, I would wrap with a product called Melolin. This is available from chemists, and has a plastic side and a non-plastic side. This product is the opposite to Animalintex as you place the plastic side onto the wound. This is a special packing that won’t disrupt the healing wound underneath every time you re- bandage. I like to apply products to the Melolin to help the healing process. My favourite product to use is honey.
I love honey as it is natural and has amazing healing properties. Manuka honey is the best as it has high healing properties in it. However, any untreated honey has some healing properties. Blackmores has an amazing product that is available, called Manuka Wound Gel.
If you are not a fan of honey, you can use products such as White Healer or any zinc-based products. The idea of products you are putting on is to prevent any bacteria from entering and not slowing down the epithelialisation process that is starting.
Products not to use now are Tuffrock – an amazing product used in the right circumstance, but it is basically mud! If you have just cleaned a wound and disinfected it, would you go and put mud back there? No! Another two products not to use are Prednoderm or Dermapred. These products, again, used in the right situation are brilliant. If you use them too early, they actually prevent proud flesh or granulation tissue from forming, thus slowing the healing process. As I highlighted earlier, granulation tissue is a necessary process in wound healing and these products contain a cortisone, which inhibits inflammatory cells from migrating to aid healing.
Bandaging
A really important point to note is bandaging. A poorly applied bandage is worse than leaving a wound open. If the bandage is too tight, it impedes the circulation that is required to get immune mediators and inflammatory cells into the area.
Likewise, if a bandage is too loose, it causes rubbing and friction, which disrupts the healing process taking place. Cells have to migrate across the wound and, if there is constant moving, this is inhibited.
Head to the members area and check out the videos on how to bandage certain areas of the horse.
ed, or proud flesh,
can now be left
/r pped for
‘oxygen’ therapy
Remembering to use cotton wool for padding if you are not confident on bandaging and, if using a stretchy semi sticky bandage (like Vetrap or Riprap), don’t pull it too tight. Also, if you buy the cheap ones, remember they can shrink if they get wet – causing a tourniquet effect on the limb. Another thing to consider is how often to change the bandage. I like to change bandages every 3-4 days in cooler months and 2-3 days in hotter months. I
would only change bandages every day if the wound is discharging a lot or there is a lot of pus being produced.
Now the age old question – “How long do I keep it wrapped for?”. Wounds need to remain wrapped until a healthy granulation bed has formed.
Granulation tissue prevents bacteria and infection entering the wound, so it is safe to stop wrapping once this has formed over the entire deficit (or wound). These photos depict a healthy granulation bed. I like to administer ’oxygen therapy’ now – i.e. keep the wound open.


Applying White Healer or Chloromide spray during this period is best. This is the stage where you need to keep an eye on the proud flesh production or granulation tissue production. Some people love to use the ‘green’ creams now, such as Dermapred. I, however, like the body to do it’s own thing and just monitor the proud flesh. If the wound is over a joint or in a highly moveable area, proud flesh is inevitable.
Products to decrease proud flesh are Debrisol Spray, Dermaclens and the list goes on, but I have great success with Copper Sulphate (or Bluestone). However, copper sulphate will eat away normal tissue along with proud flesh, so use it sparingly, never wrap it on and always wash the area within 24 hours of applying to remove excess product. I will often mix it with Vaseline (50:50) and apply carefully to the proud flesh borders that are protruding over the surrounding skin. Be very careful when applying to wounds over tendons or joints as it can debride or eat through tendons also. I also like to apply chloromide spray around the edges to prevent flies from landing on the healing wound.
If the wound is unable to be wrapped, due to location, it is important to make sure the wound is not getting contaminated with mud, etc. so
confining your horse is often best. Applying a wound spray, like Cetrigen or Chloromide, is important to give some disinfectant cover, along with preventing flies from entering the wound. Maggots are often used to clean contaminated wounds in the medical profession, but they are not your garden variety maggots – they are laboratory-grown and fed sterile foods so they are clean.
Once the epithelialisation process has finished and the wound is in the maturation phase, now is the time to be applying White Healer creams,
pawpaw cream, fish oil tablets (omega 3 and 6 oils) or Dermapred creams to minimise the width and length of the scar. The key in this phase is to not let the scar dry out, so it can contract to a small thin line. Now, you will have a scar that no one can notice and, if you took pictures at the beginning,
even you won’t remember the amazing job you have done healing your horse’s wound!

